Pages

Tuesday, September 28, 2010

TuRQuoISe

A  TURQUOISE project...
I am entering my Turquoise project over at this week's The CSI Project challenge.
Visit thecsiproject.com

It's a before and after.
Do you know what it is?


Now??

How about now?


It's my thrift store find kid's chair.

Here is the before.


I originally spray painted it red and thought I would do turquoise stripes.
I even had my boys helping me with the strips.


But then I changed my mind and painted it all turquoise.
To add a little fun, I cut out lowercase alphabet letters on my Cricut and ModPodged them onto the seat.


Added some cute buttons to the back and along the bottom and there you go.


I guess he's thinkin'.
Probably about being a fireman one day.


The before and after.


Monday, September 27, 2010

A Cozy Gray Wreath


Just finished this little guy. 
I added the book page ornament in the middle.


I got that idea from last year's 12 Days of Handmade Christmas Ornaments
and the tutorial by Bridget @ Everyday Chaos
Click here to see how to make it.


Now I just have to make a buddy for this one.
Maybe later.

There is too much laundry to ignore.
UGGGGHHHH.


mmm button


Sunday, September 26, 2010

Crafting with Gray

I love gray...
gray t-shirts, gray sweaters, gray yarn, gray paint.

And I am at it again,  a yarn wreath. 
Make that 2. 
One for each of our back french doors.


Not done yet, it's a work in progress.
I am adding some really cool in the middle.


Tomorrow hopefully they will be done.


This is the progress so far.
More to come soon.

We crafted away this weekend.
The husband even joined in.

I have seen the oh-so-popular subway art all around blogland and I decided to make my own over the weekend.

This one is for my boys,
it is in the hallway by their bedrooms.

Kind of a "house rules" for the kids kind of thing.
They can't read it yet,
but once they can I hope these things remain important to them.
Until then we will read them together.


Things have been crazy around here.
One open house down, one to go this week (oh yeah, I am coordinating this one!)
But I am happy to be involved in my kids' schools. 

Because soon enough they will want me to drop them off on the curb...
you know, the one a couple blocks away.

Monday, September 20, 2010

Pure Quilt

It's finished! 
Finally!


I saw this awesome tutorial posted at Moda Bake Shop by KarrieLynn @ Freckled Whimsey back in July.
I made mine slightly different - it is smaller and I added a pieced border. 
It measures 62 x 43 - great throw sized quilt.

I pieced it several weeks ago and just last week I finished the quilting and binding. 

The fabric on the quilt top is Pure from Sweetwater for Moda
I used one Pure Jelly Roll and one Moda Natural Jelly Roll.


The backing is a fabric I found at The Hobby Lobby.
Along with a pieced strip using the Pure & Natural fabrics from the front to tie it together.
Binding is also from the Hobby Lobby - a dark chocolate brown.

Dear Hobby Lobby, thank you for coming to Orlando.
~ Kristin


A close-up of the quilting.  Just small loops. 


This one is kind of a big deal for me. 
First of all, it is the largest quilt that I have made (so far)
Second, it is the first time that there are no overlaps, puckers, whatever you call it, on the back! 
I saw a tutorial at 365 Days of Free Motion Quilting to divide the quilt into quarters and start in the middle.

This is exactly what I was NOT doing. 

So I gave it a try and it worked beautifully.
Thank you!!

I am so happy this one is done, it has been sitting in the corner staring at me for awhile.  Not anymore!


Saturday, September 18, 2010

Halloween Tree with Ornaments

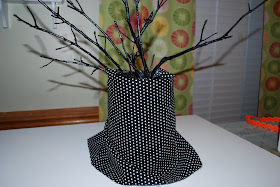
This is my Halloween Tree.


Along with Ghost and Bat ornaments too!


Here is how I made it

I did not buy anything new for this tree.

I found some twigs out in our yard and had my boys help me paint (not spraypaint, regular paint, just because I did not have any black spray paint lying around, but that would work great).

And I went through some of my Halloweenish fabrics to wrap this cookie tin.

I bought that tin months ago from Home Goods but it was just sittin' around so I thought it would be perfect to hold the twigs.  I stuffed it with paper towels so that the twigs would stay in place.


I chose the black polka dot fabric (of course polka dots!) and wrapped it around the tin.


Then I added a dab of hot glue to the edge and wrapped it over the top and secured it with the glue.  The bottom of the tin is not glued and just drapes.  I planned this for my mantle so it did not matter what the bottom looks like for me.

Next to make the ghost ornaments.


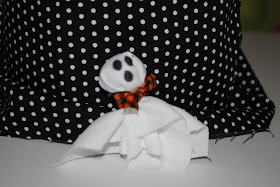
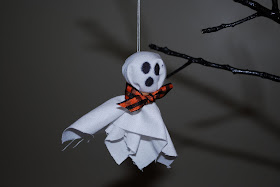
I found a scrap white fabric from my stash and roughly cut several  4 x 4 squares (not exact at all)


I added a small amount of fiber fill to create a ghost's head and closed the fabric around it.


Wrapped a rubber band around the fabric to secure the fiber fill and created a ghost's head.


Then I used a sharpie to create the eyes and mouth and wrapped a ribbon around the rubber band creating the ghost.


I threaded a needle and placed the string towards the back of the ghost's head to hand from the tree.


As for the bats, I Googled "Halloween Bat Patterns" and just free handed cutting a bat form from felt.  Hot glued some ribbon to the back of the bat and hung it from the tree.

Just keep making ghosts and bats and add them to your tree.

I added some orange ric rac to tin and I also made some of the ghosts from other fabrics. 

The messy strands of glue that a glue gun creates worked great to give a spider web effect on the tree. I did that last once all of the ornaments were on the tree. 


And here it is on my mantle.


Join us Saturdays at tatertotsandjello.com for the weekend wrap up party!

Photobucket